Completion collectible · 11 locations

All 11
Map Fragments

This route set collects every Map of Fainweald and Map of Mammon fragment. Each capture uses a named Beacon as its starting point and keeps the original red-arrow navigation visible.

Fainweald
5 fragments
Mammon
6 fragments
Related achievement
Sat Nav

Region one

Map of Fainweald

Five fragments are spread between Widow's Overlook, Mushroom Village and the outskirts around Nochte. Fainweald [5] requires the corruption-cleansing progression described below; the gate to Fainweald [2] requires the Citadel Gate Lever.

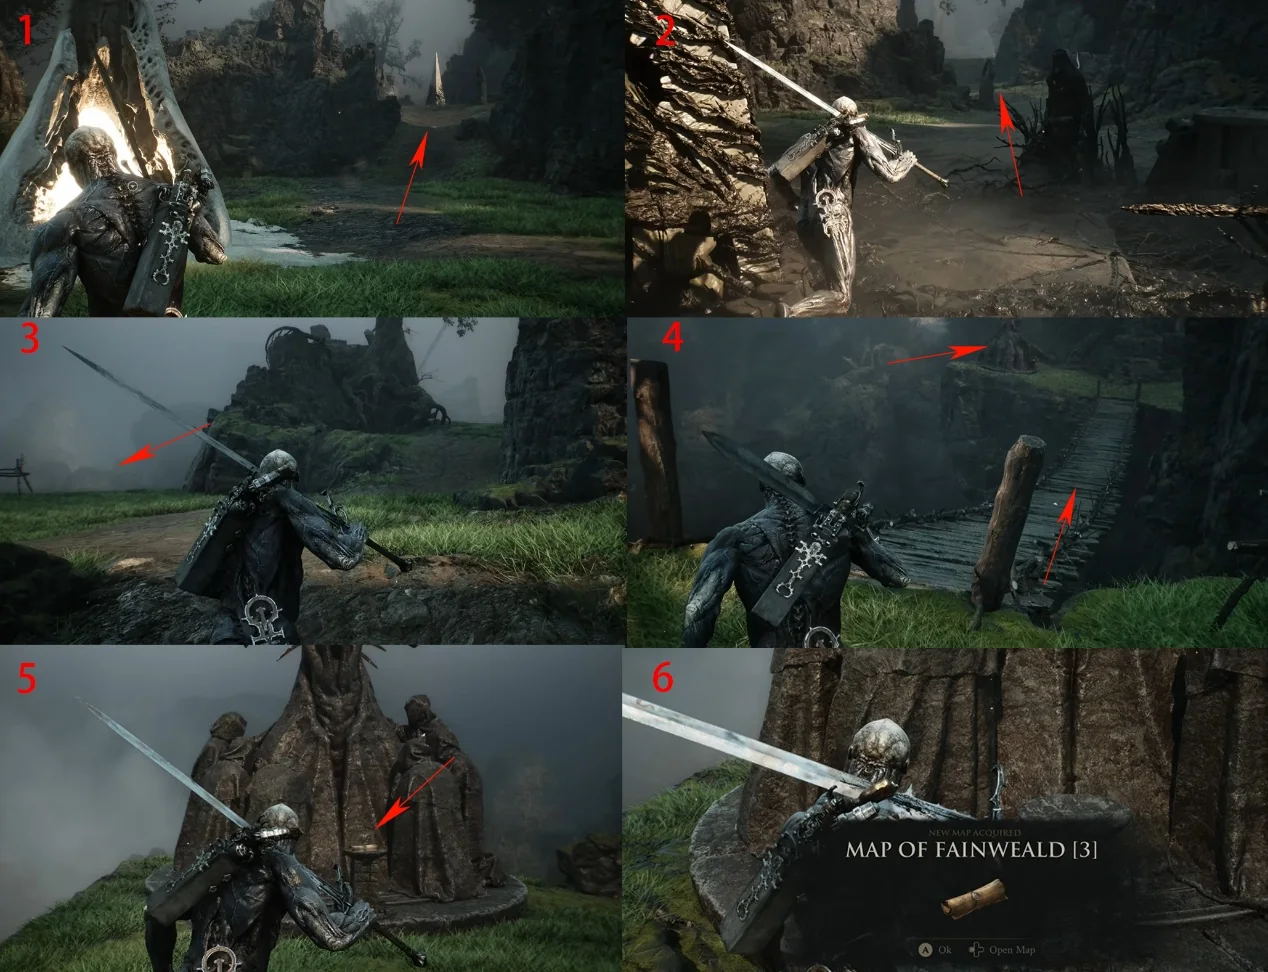
Map of Fainweald [3]

Start at Widow's Overlook Beacon.
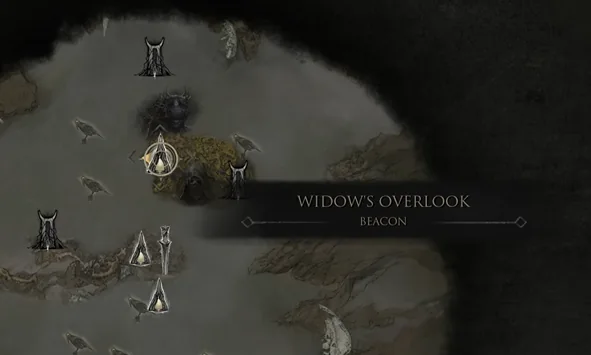
Widow's Overlook Beacon on the world map
Starting pointTravel to Widow's Overlook Beacon.
Annotated route from Widow's Overlook Beacon to Map of Fainweald 3
RouteFollow the marked arrows to Ruk and collect Map of Fainweald [3].

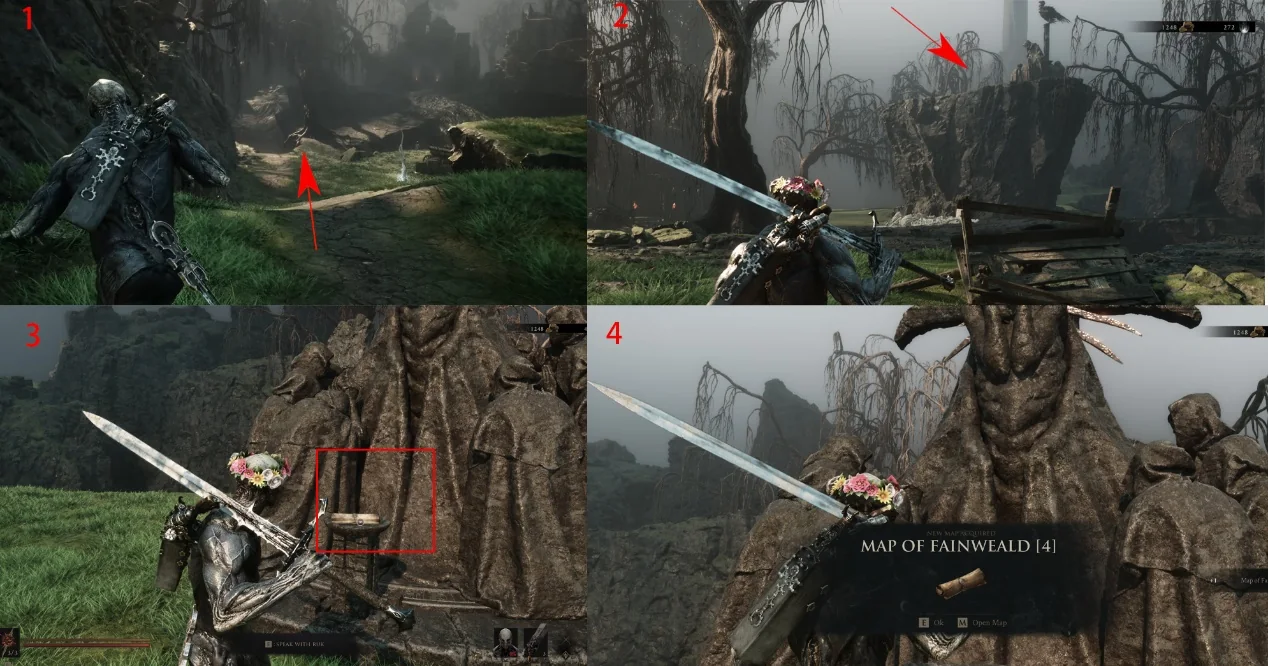
Map of Fainweald [4]

Start at Widow's Overlook Beacon; the route passes the Mushroom Village gate.
Widow's Overlook Beacon on the world map
Starting pointTravel to Widow's Overlook Beacon.
Annotated route to Map of Fainweald 4
RouteFollow the arrows to the Mushroom Village gate, turn around toward Ruk, then use the jump device to reach Map of Fainweald [4].

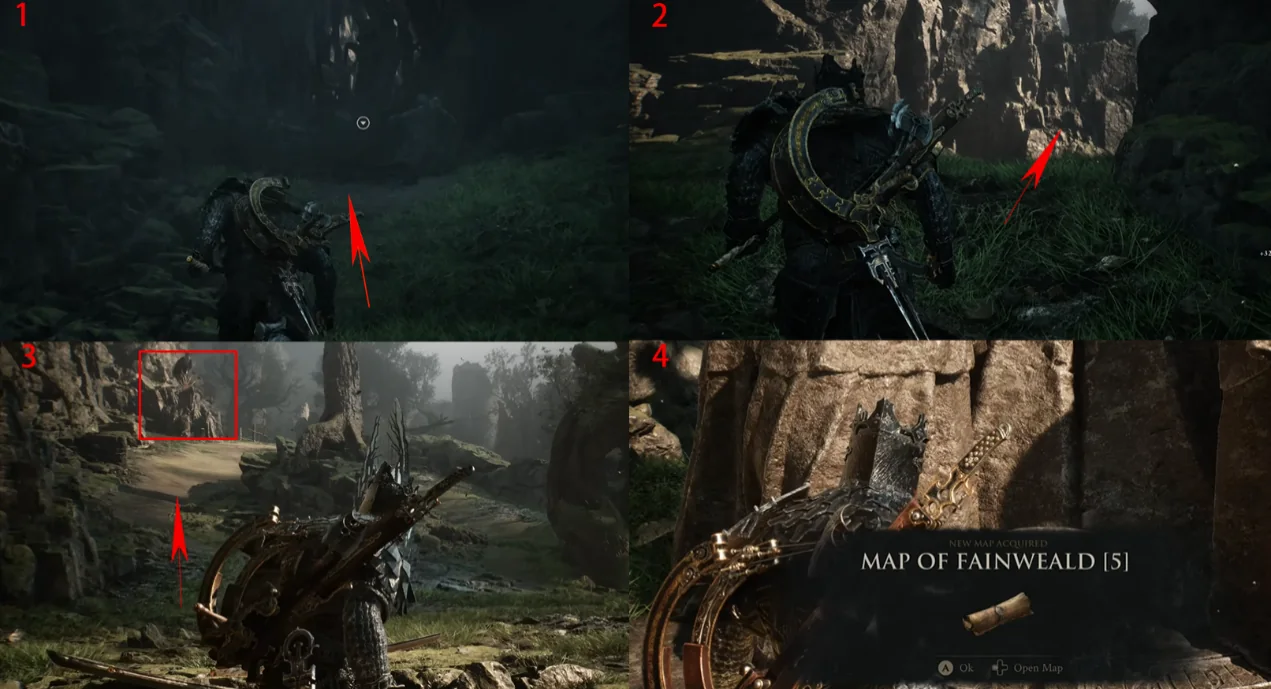
Map of Fainweald [5]

Start at Mushroom Village Beacon.

Requirement: collect enough Ova and use the Gloom Siphon in Marrow Keep to unlock Mether's Breath and cleanse the corruption before taking this route.
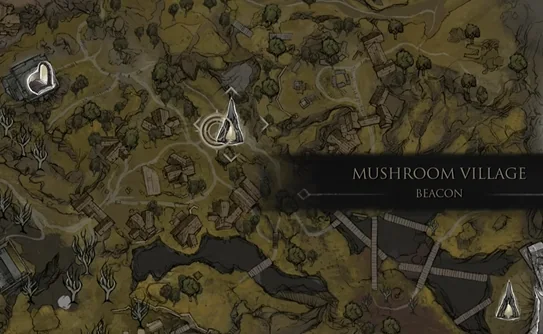
Mushroom Village Beacon on the world map
Starting pointTravel to Mushroom Village Beacon.
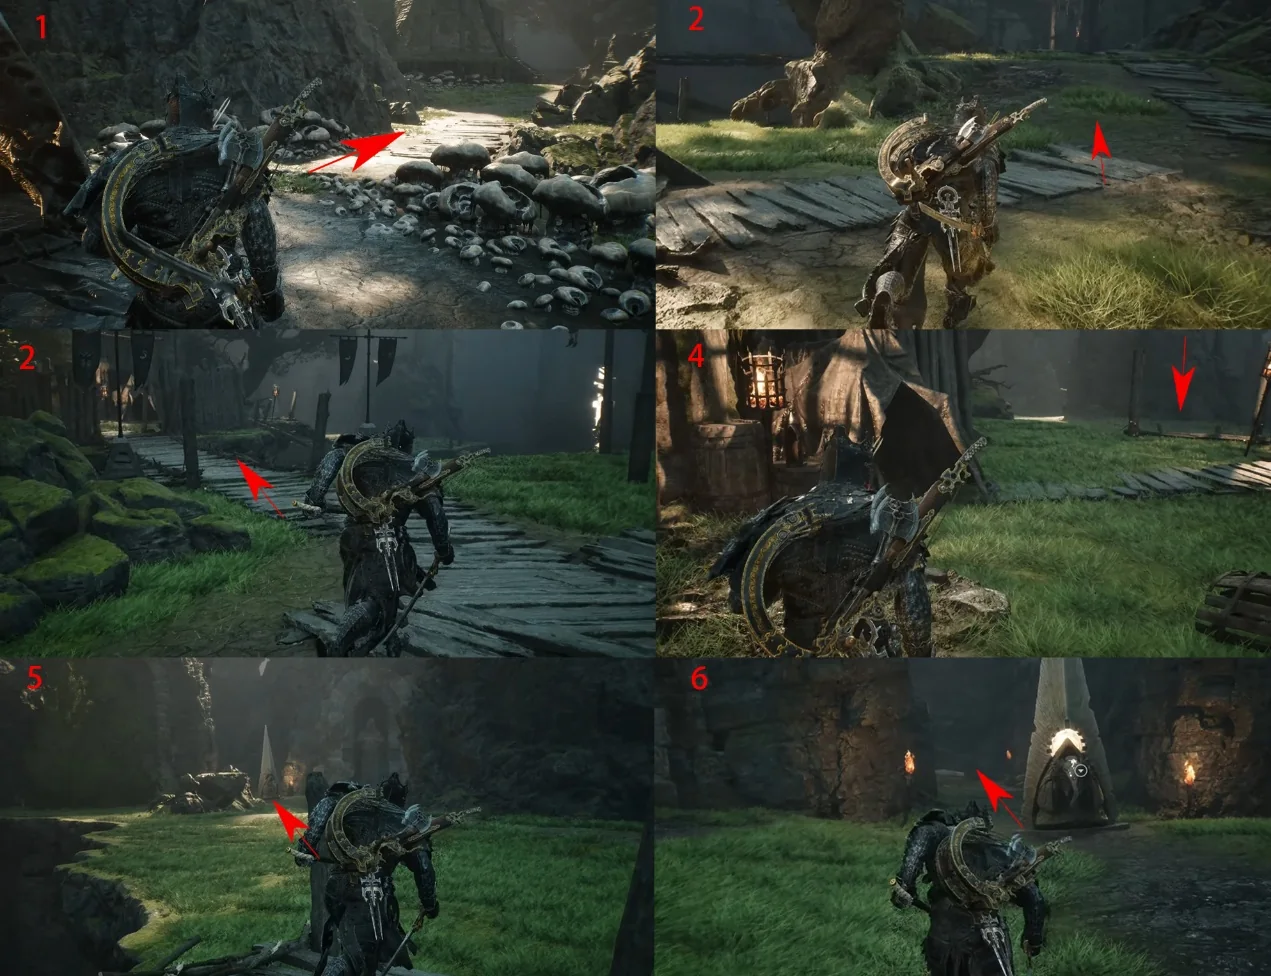
Annotated route leaving Mushroom Village Beacon
Route 01Follow the marked path from Mushroom Village toward the cleansed route.
Annotated route to One-Legged Wolf Beacon and Map of Fainweald 5
Route 02After cleansing the corruption, take the right route to One-Legged Wolf Beacon. Ruk is behind the Beacon with Map of Fainweald [5].

Map of Fainweald [1]

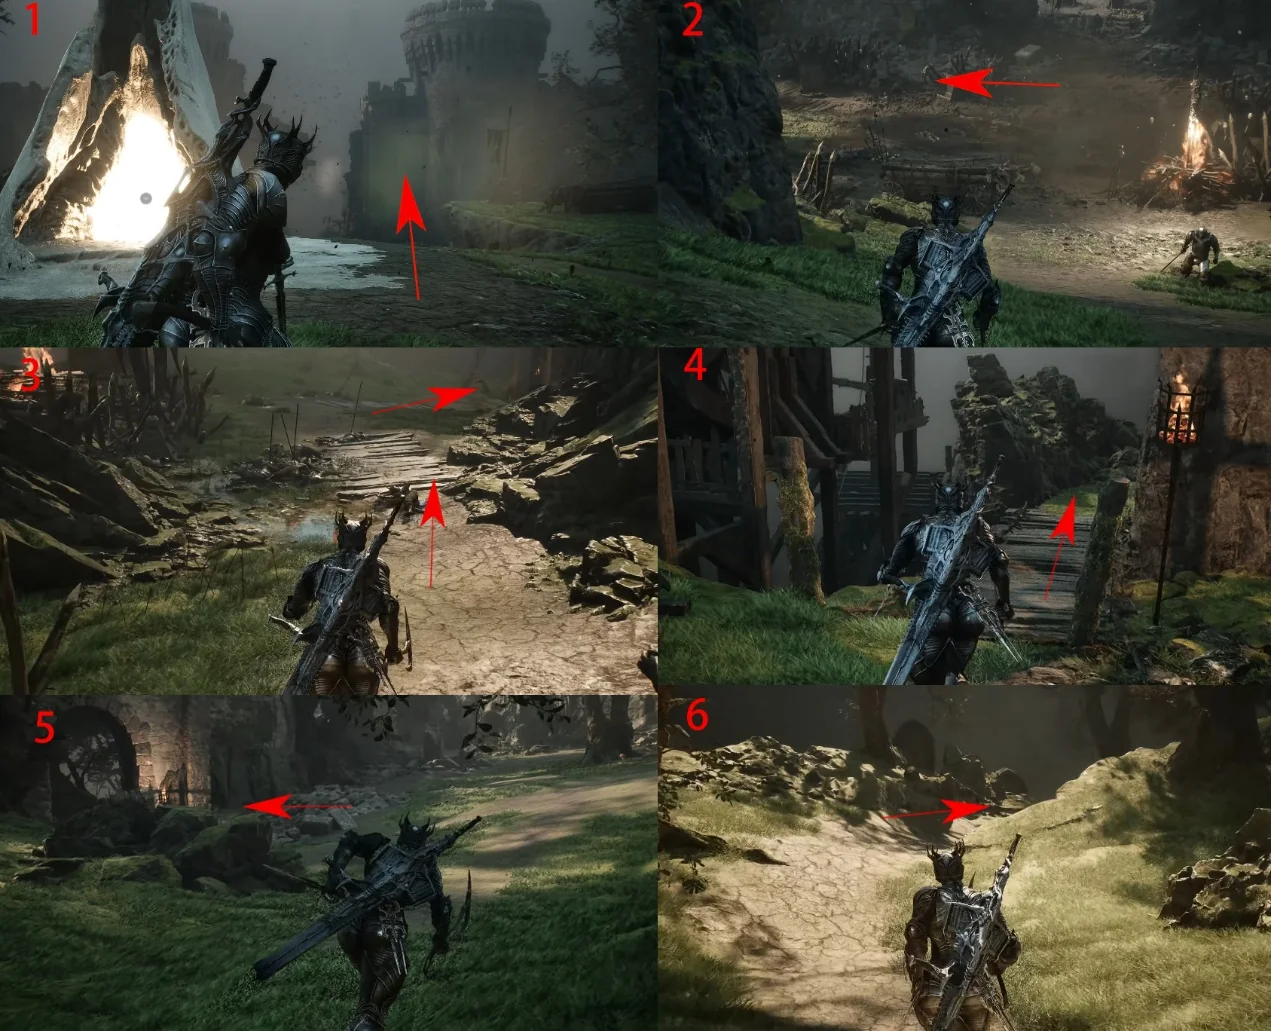
Start at Widow's Overlook Beacon, then travel to Outskirts of Nochte Beacon.
Widow's Overlook Beacon on the world map
Starting pointTravel to Widow's Overlook Beacon.
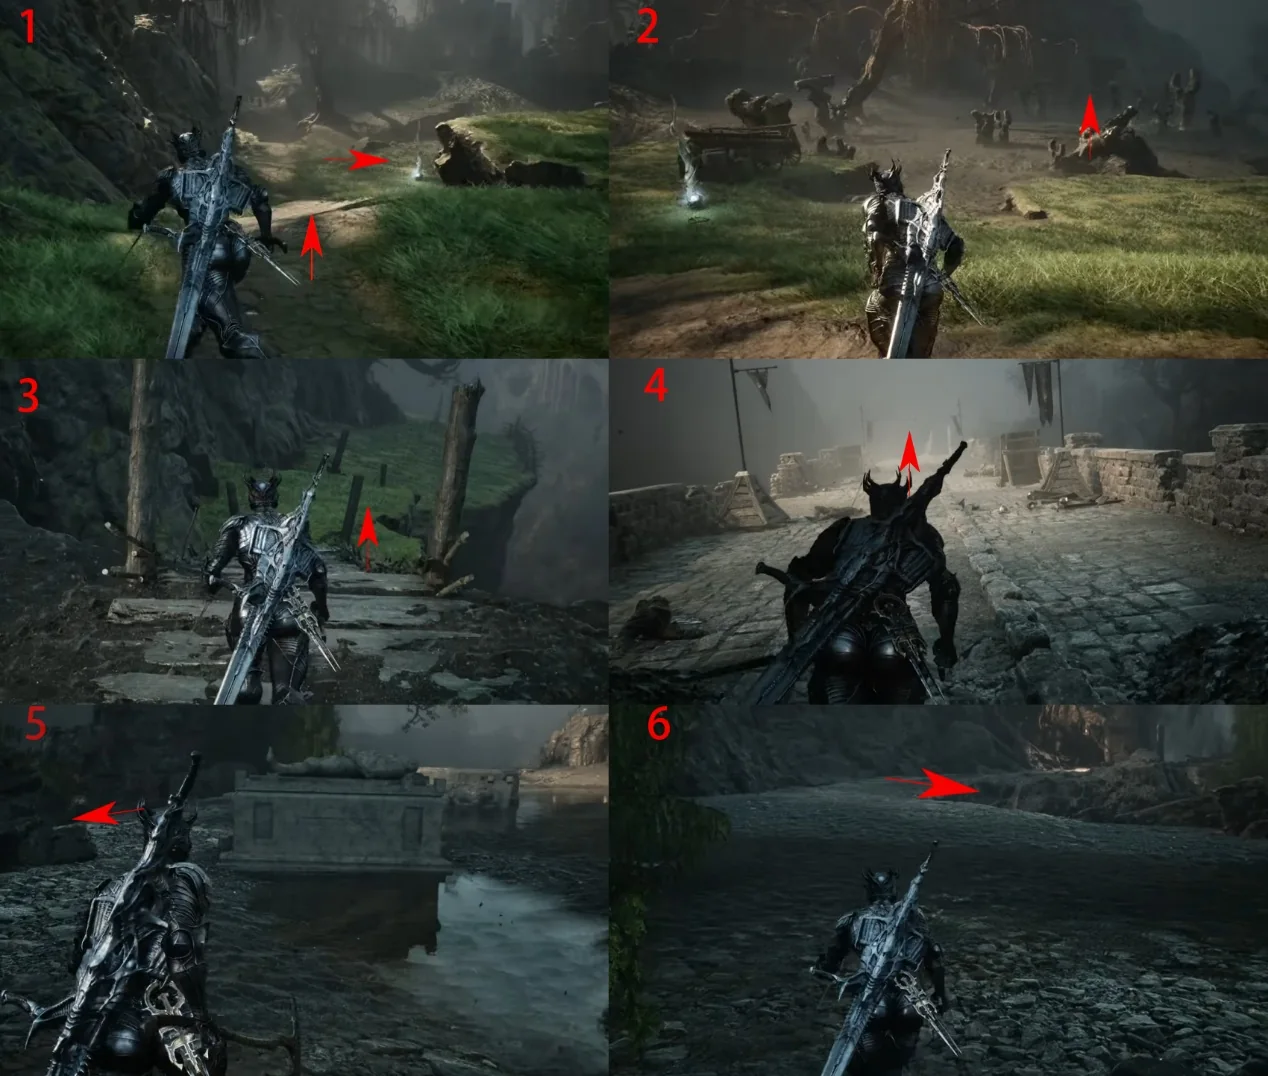
Annotated route from Widow's Overlook toward Outskirts of Nochte
Route 01Follow the red arrows from Widow's Overlook toward Outskirts of Nochte Beacon.
Annotated continuation route toward Outskirts of Nochte
Route 02Continue along the marked trail.
Annotated continuation route near Outskirts of Nochte
Route 03Stay on the marked path until you reach the Beacon area.
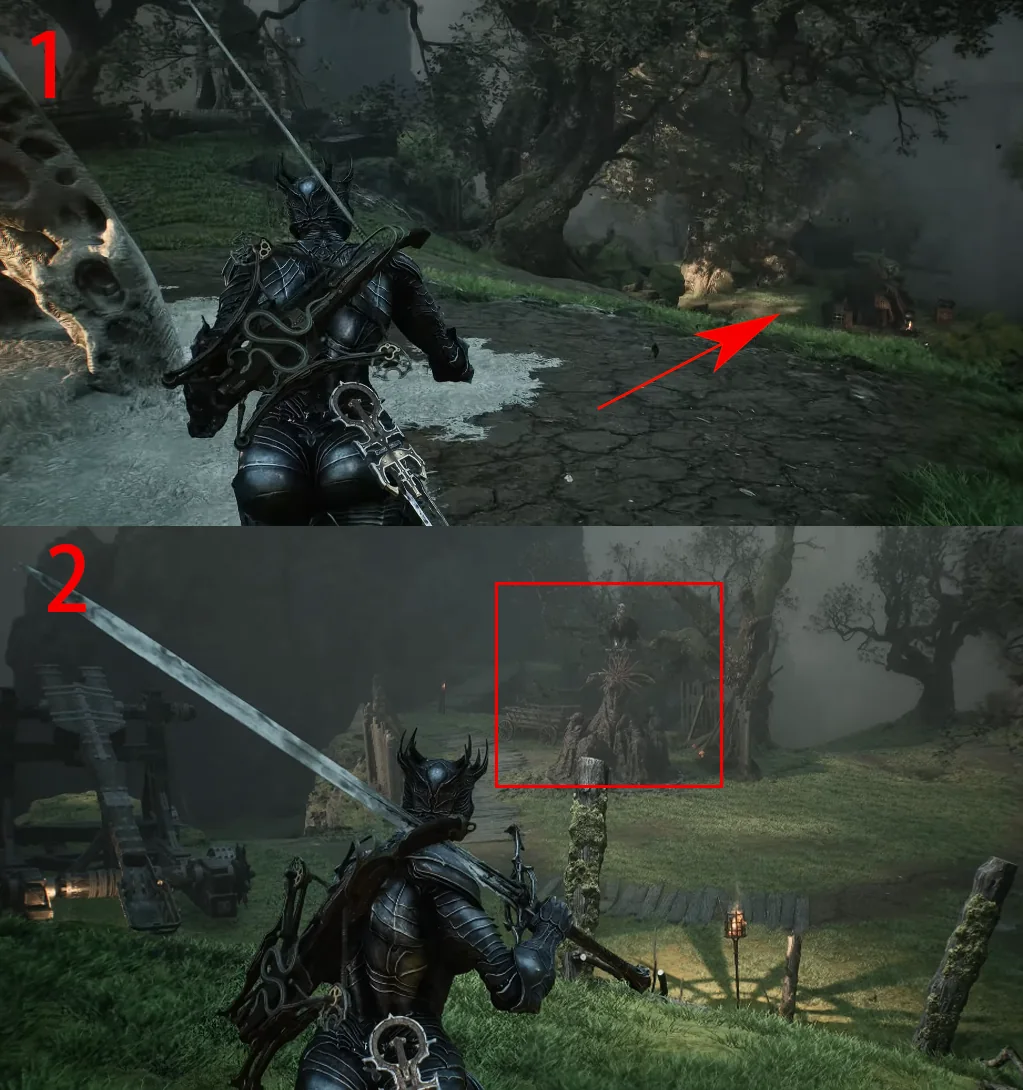
Annotated final route to Map of Fainweald 1
Route 04From the right side of Outskirts of Nochte Beacon, follow the arrows to Ruk and take Map of Fainweald [1].

Map of Fainweald [2]

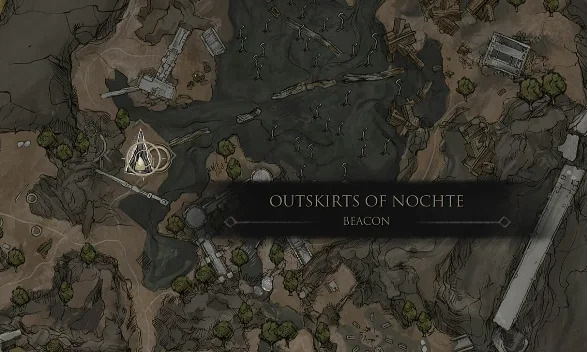
Start at Outskirts of Nochte Beacon.

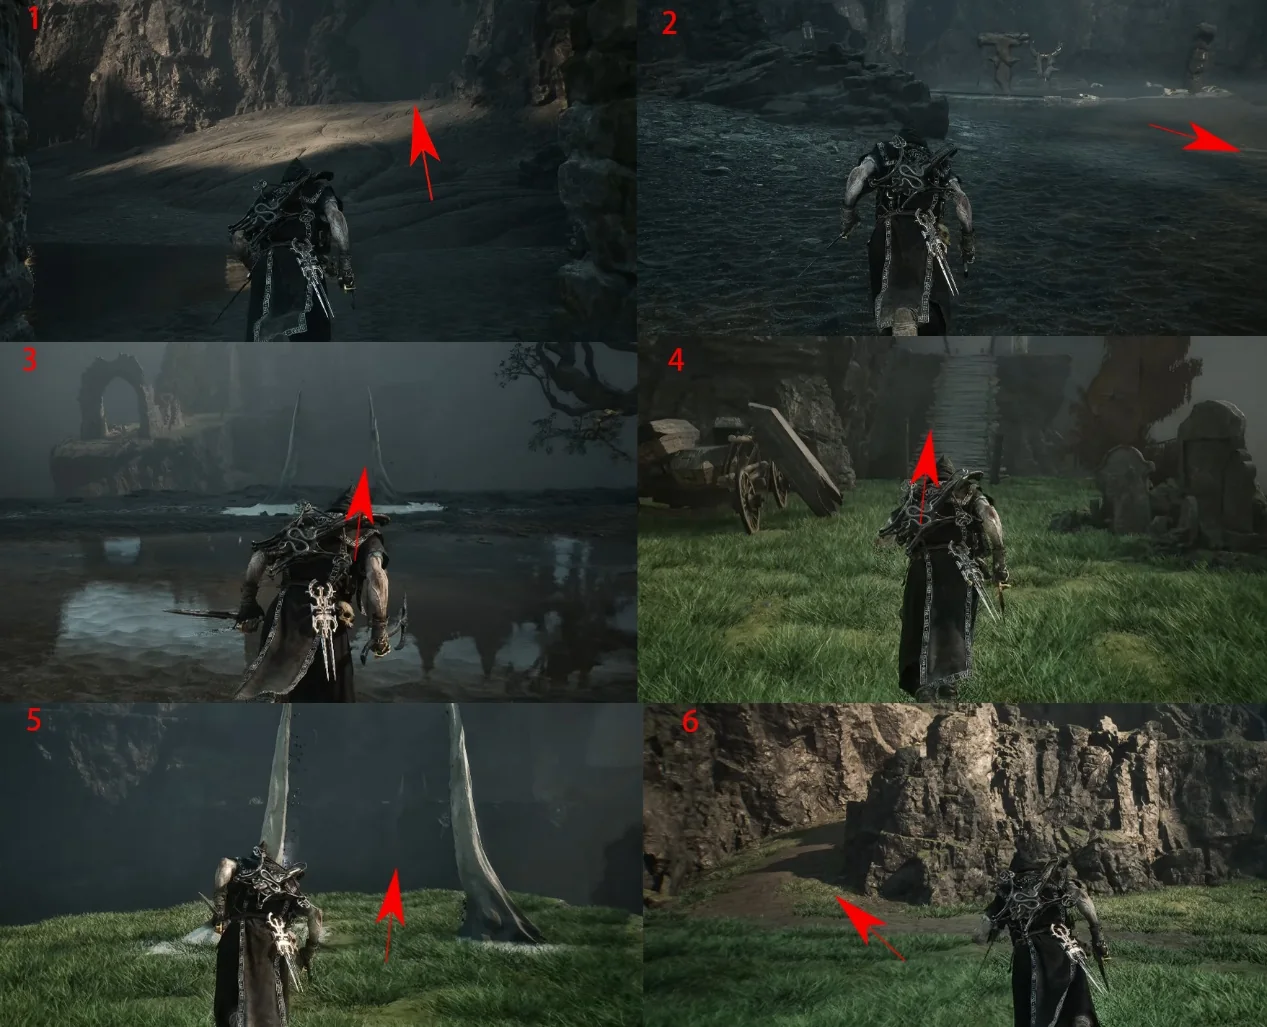
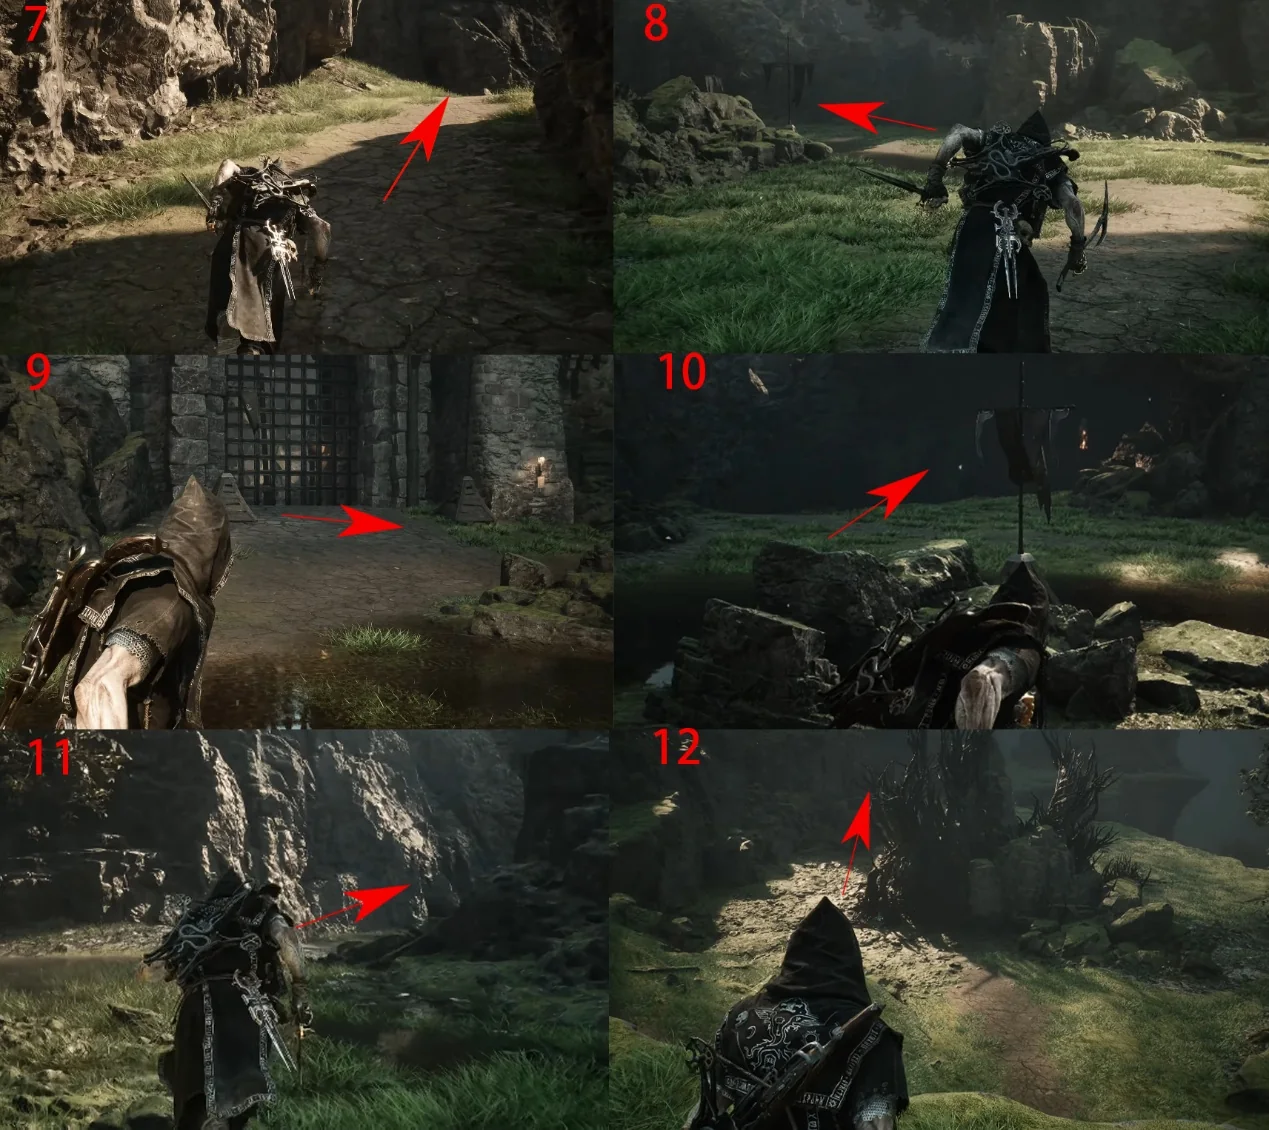
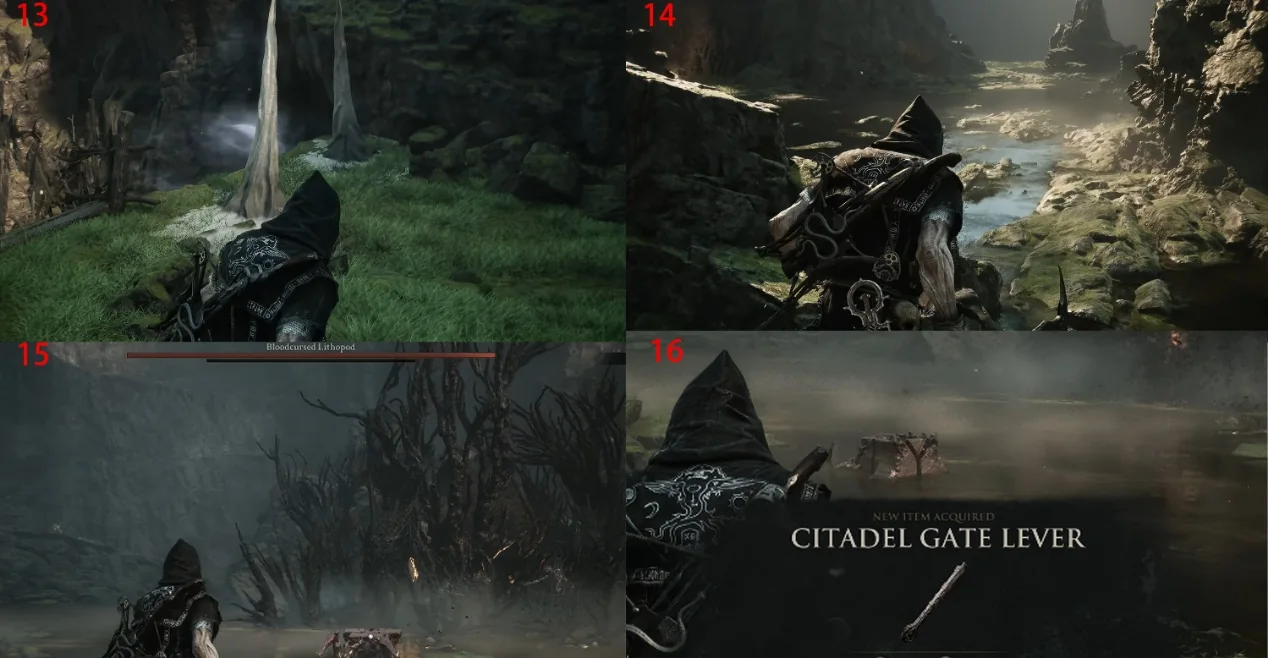
Requirement: obtain the Citadel Gate Lever. It opens the gate shown in the route before the final approach.

Outskirts of Nochte Beacon on the world map
Starting pointTravel to Outskirts of Nochte Beacon.
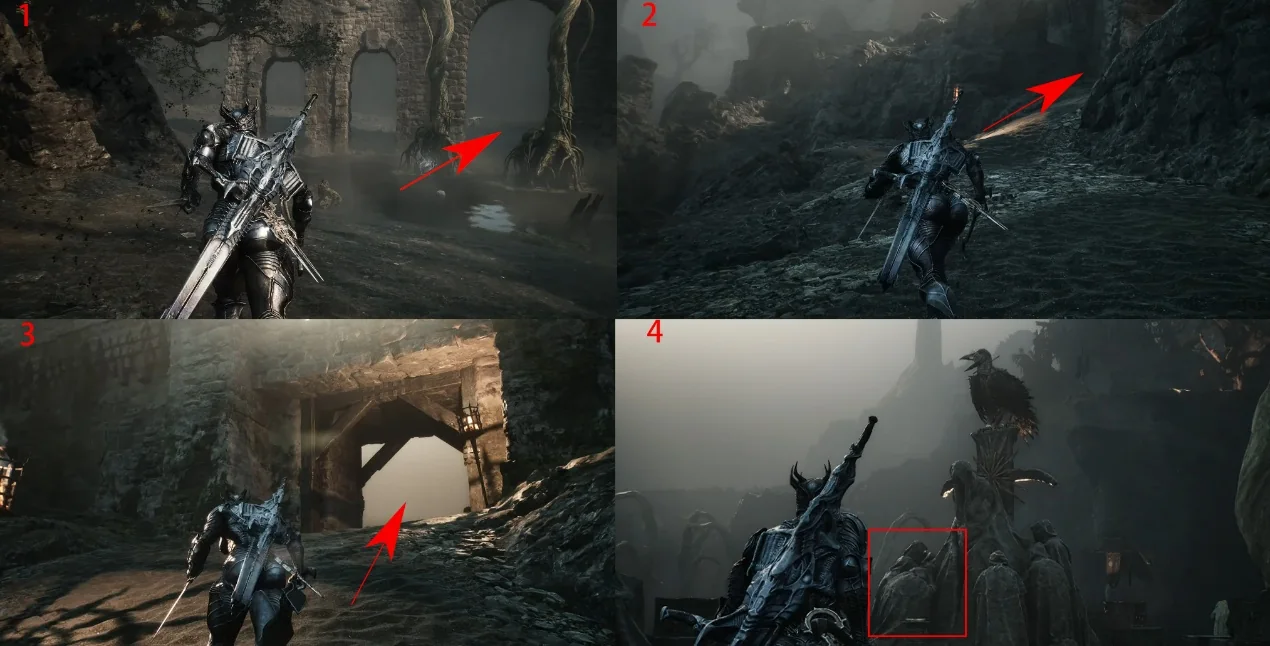
First annotated route toward Citadel Gate Lever
Route 01Take the left route from the Beacon and follow the arrows toward the gate.
Annotated route to Citadel Gate Lever
Route 02Continue through the marked route to collect the Citadel Gate Lever.
Citadel Gate Lever obtained
Key itemUse the Citadel Gate Lever to open the gate on the return route.
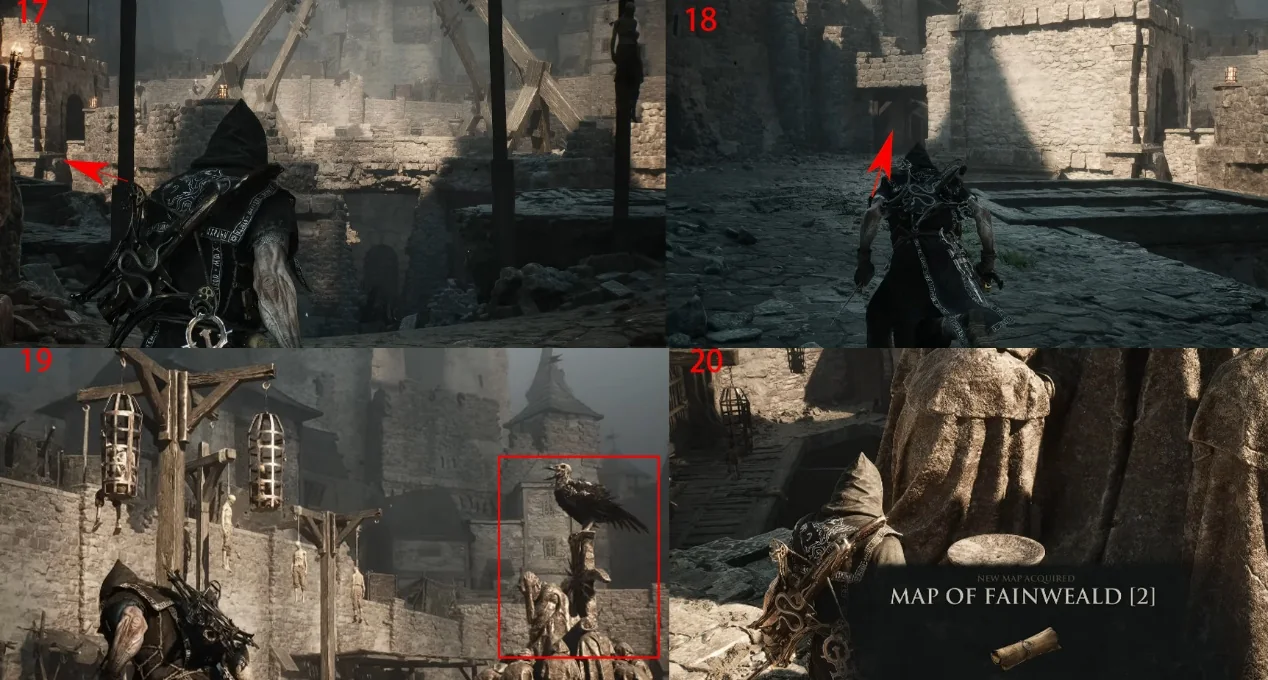
Annotated final route to Map of Fainweald 2
Route 03Return to the opened gate, take the left path and follow the arrows to Ruk for Map of Fainweald [2].

Region two

Map of Mammon

Six fragments are reached from Outskirts of Mammon Beacon and Castigator's Keep Beacon. The route images identify the correct portals, bridges and upper paths.

Map of Mammon [5]

Start at Outskirts of Mammon Beacon.
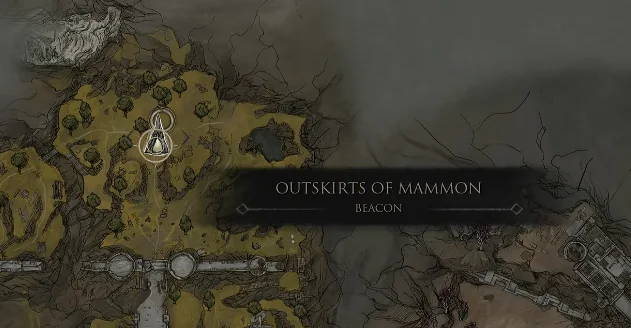
Outskirts of Mammon Beacon on the world map
Starting pointTravel to Outskirts of Mammon Beacon.
Annotated route to Map of Mammon 5
RouteTake the right-hand path from the Beacon. Ruk is a short distance along the marked route with Map of Mammon [5].

Map of Mammon [4]

Start at Outskirts of Mammon Beacon.
Outskirts of Mammon Beacon on the world map
Starting pointTravel to Outskirts of Mammon Beacon.
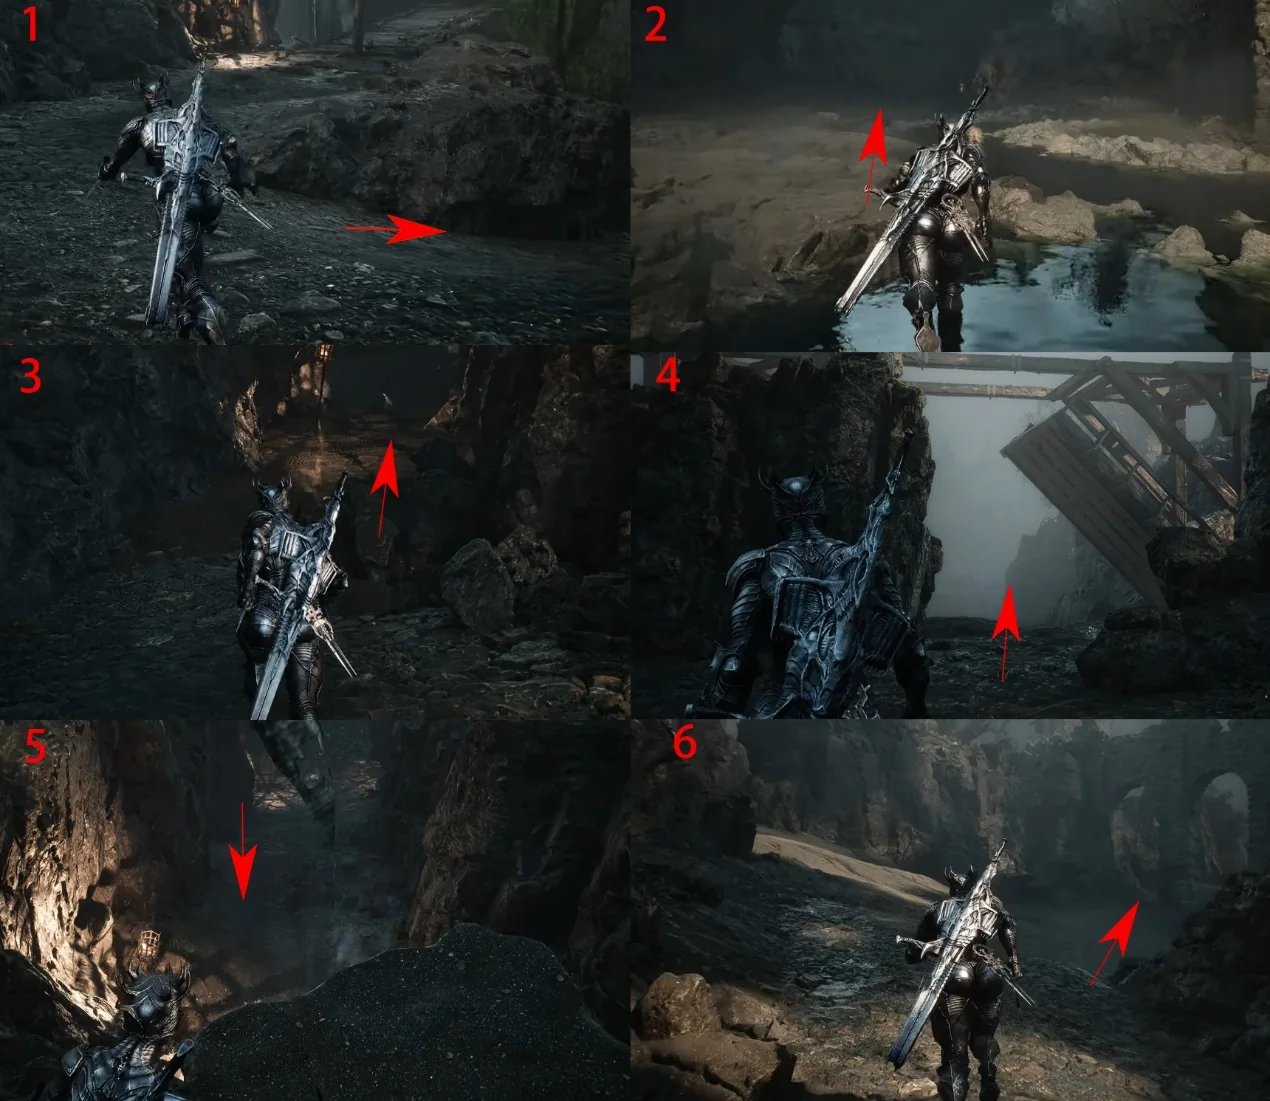
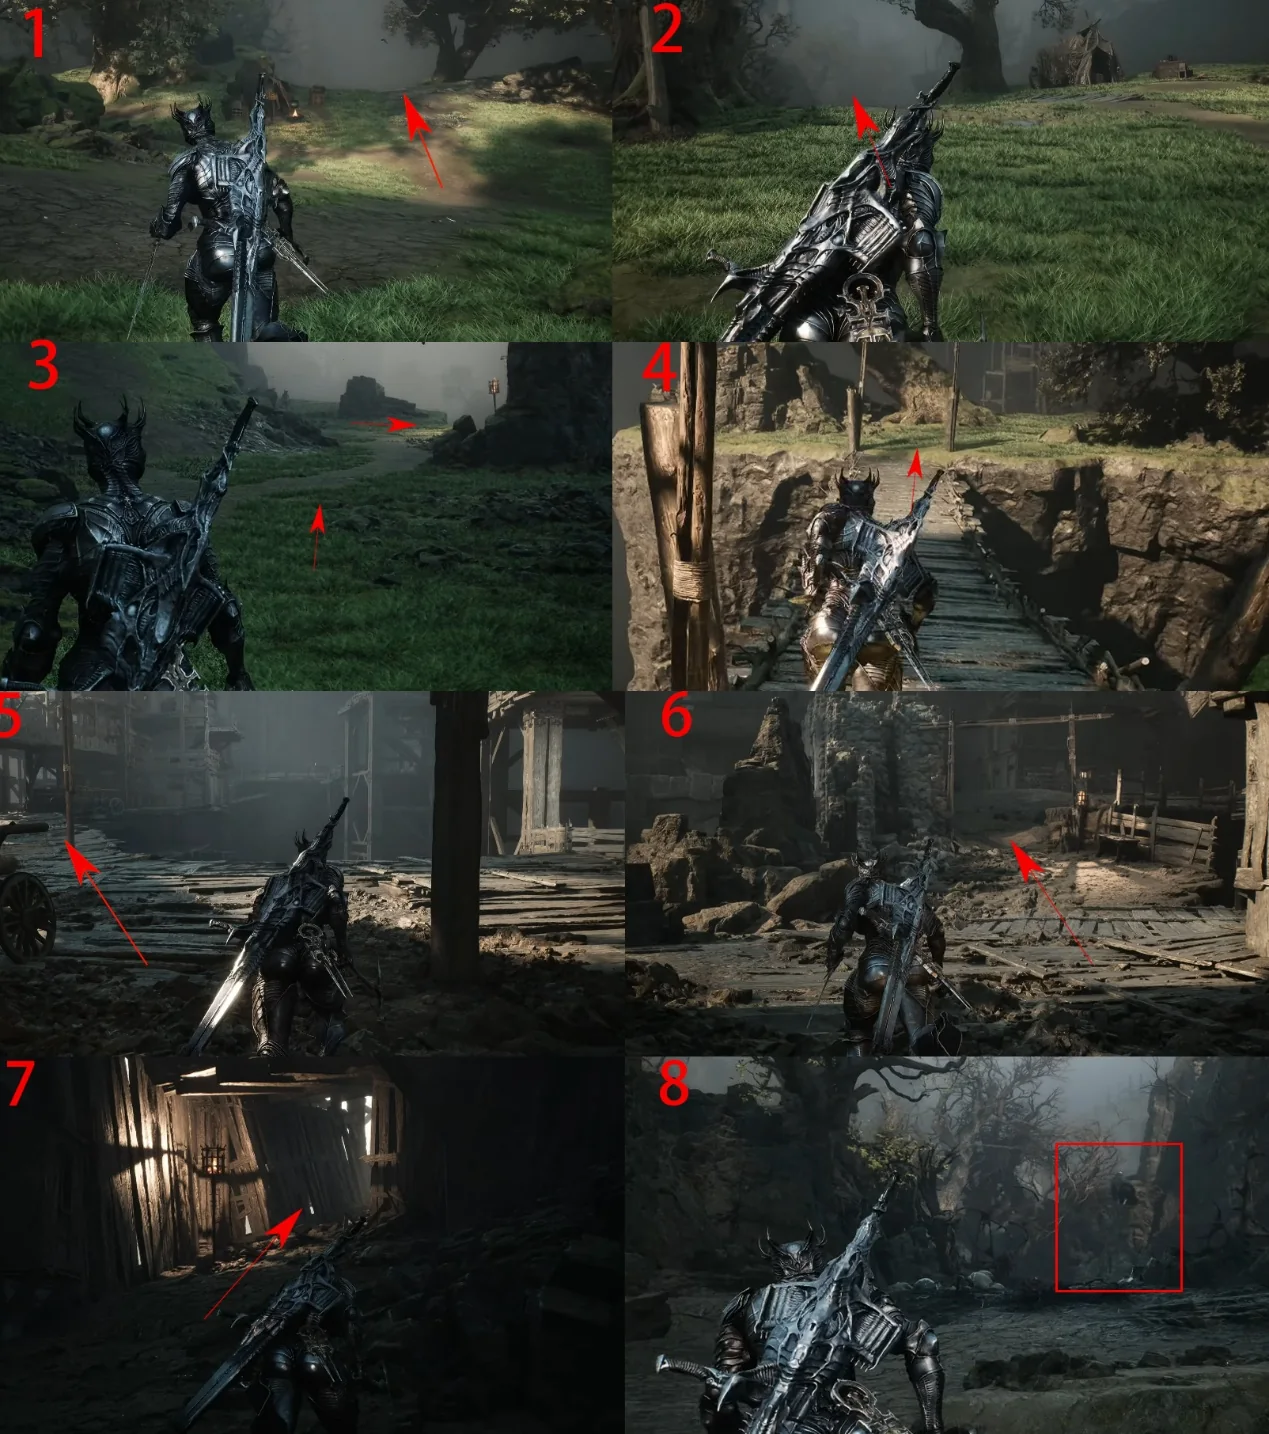
Annotated route to Map of Mammon 4
RouteHead right from the Beacon. At panel 2, use the portal, then take the right path, cross the bridge and follow the remaining arrows to Ruk for Map of Mammon [4].

Map of Mammon [6]

Start at Outskirts of Mammon Beacon; this route passes the Map of Mammon [5] pickup.
Outskirts of Mammon Beacon on the world map
Starting pointTravel to Outskirts of Mammon Beacon.
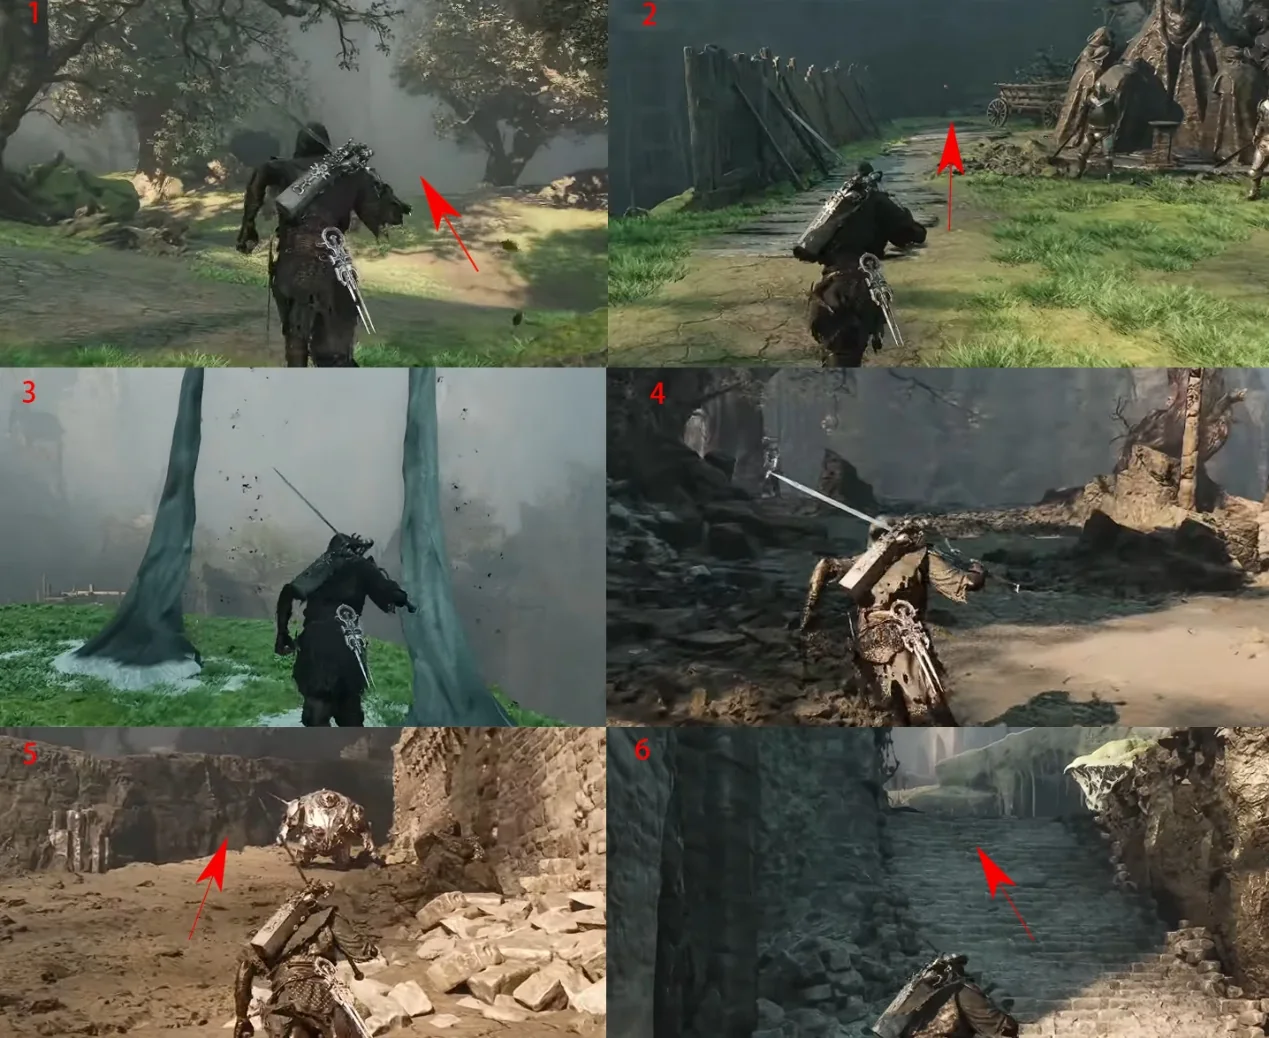
Annotated route through Deserted Slums
Route 01Head right from the Beacon, pass the [5] pickup route and use the portal into Deserted Slums.
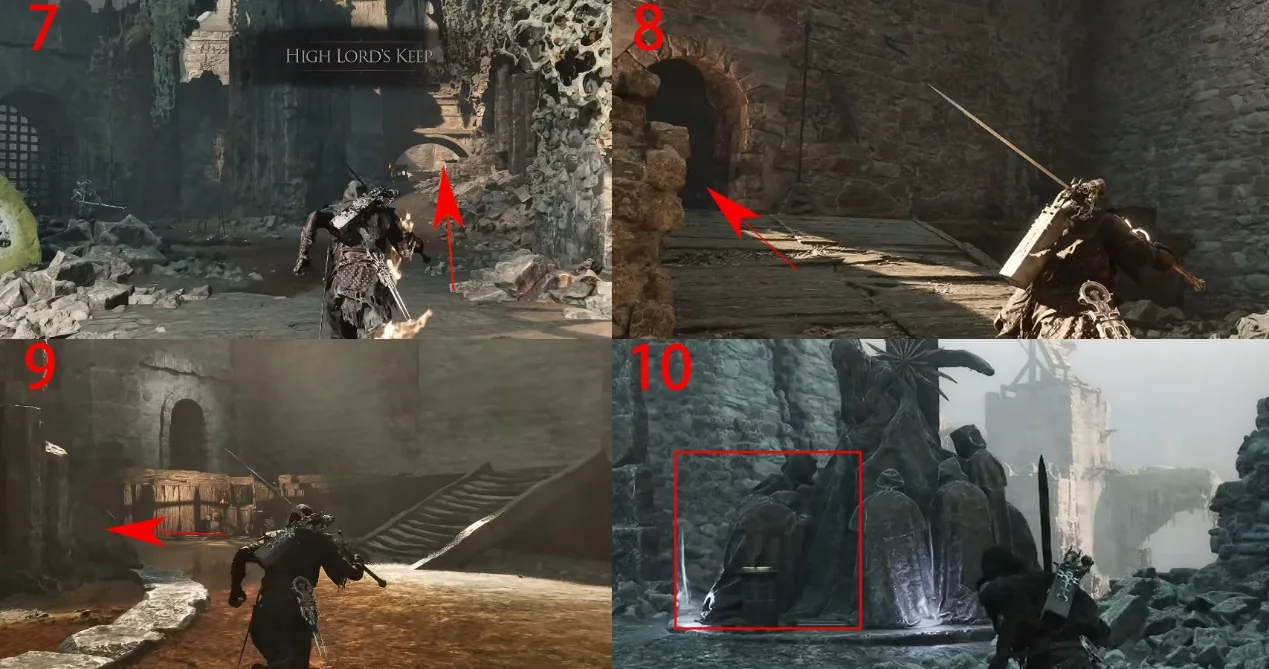
Annotated final route through High Lord's Keep
Route 02Continue into High Lord's Keep and follow the final arrows to collect Map of Mammon [6].

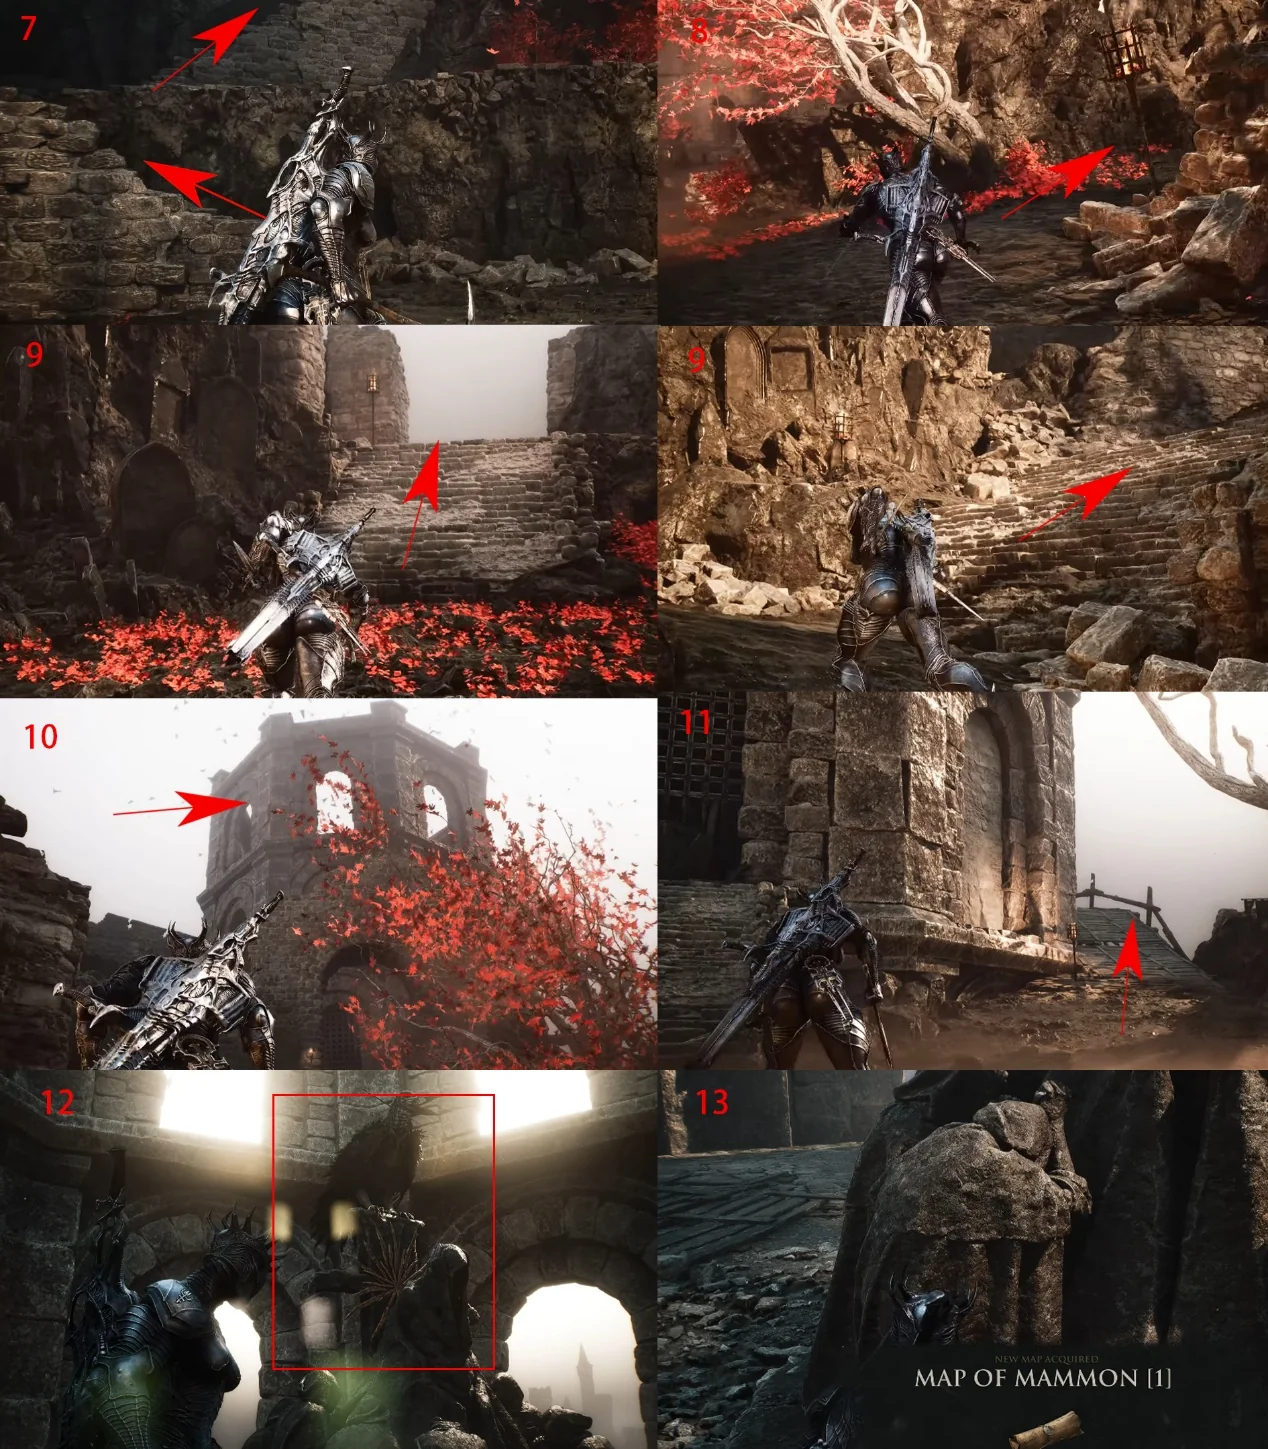
Map of Mammon [3]

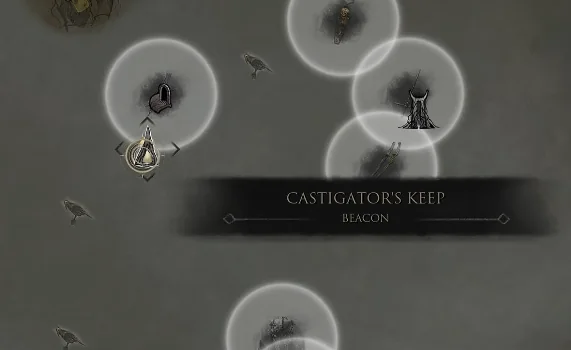
Start at Castigator's Keep Beacon.
Castigator's Keep Beacon on the world map
Starting pointTravel to Castigator's Keep Beacon.
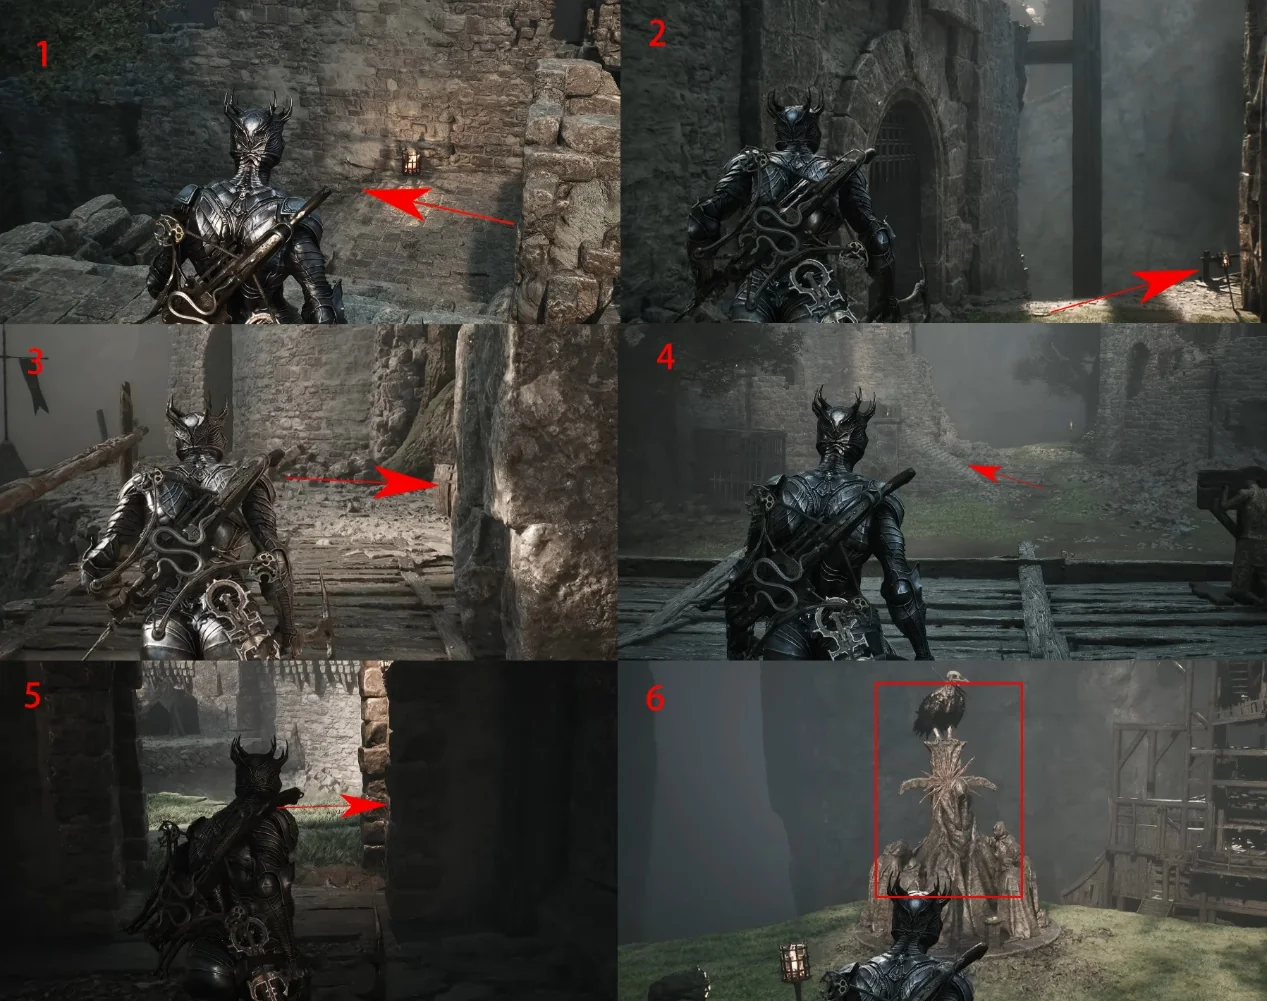
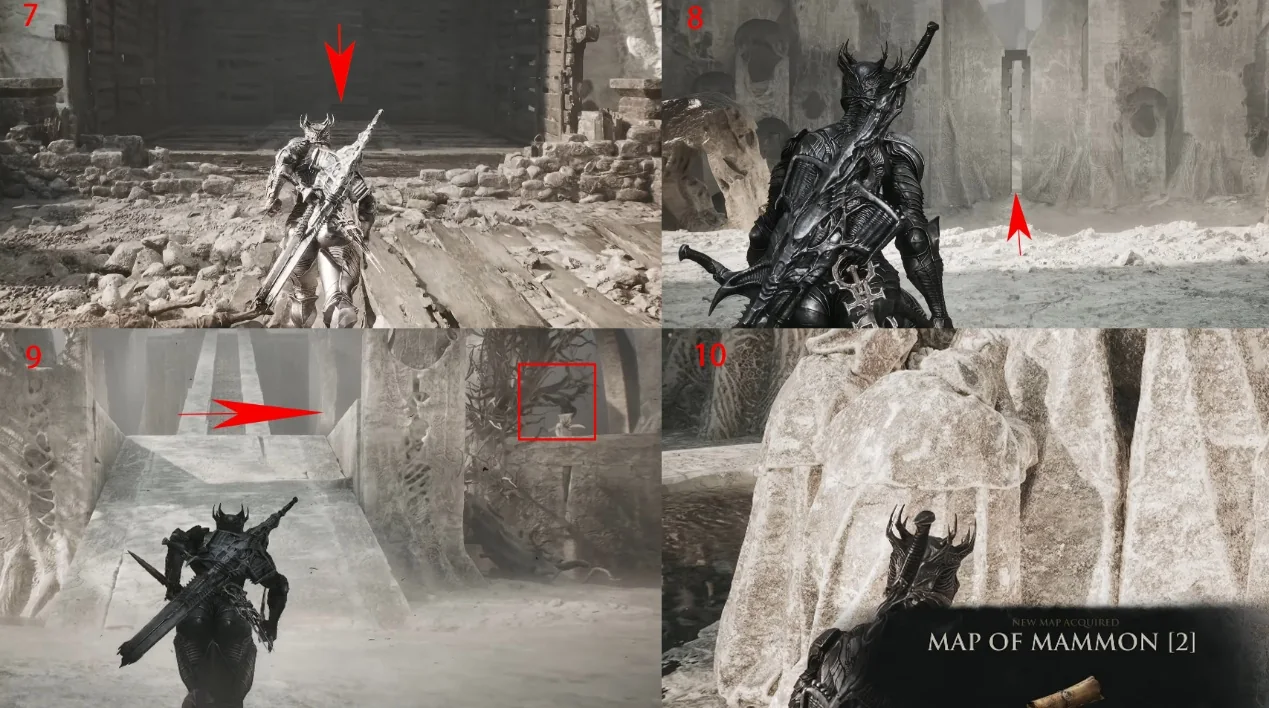
Annotated route to Map of Mammon 3
RouteGo behind the Beacon, down the stairs and along the marked route to collect Map of Mammon [3].

Map of Mammon [2]

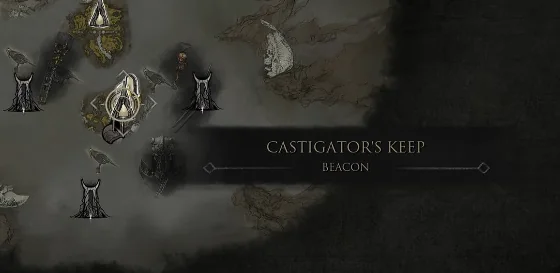
Start at Castigator's Keep Beacon.

Castigator's Keep Beacon on the world map
Starting pointTravel to Castigator's Keep Beacon.
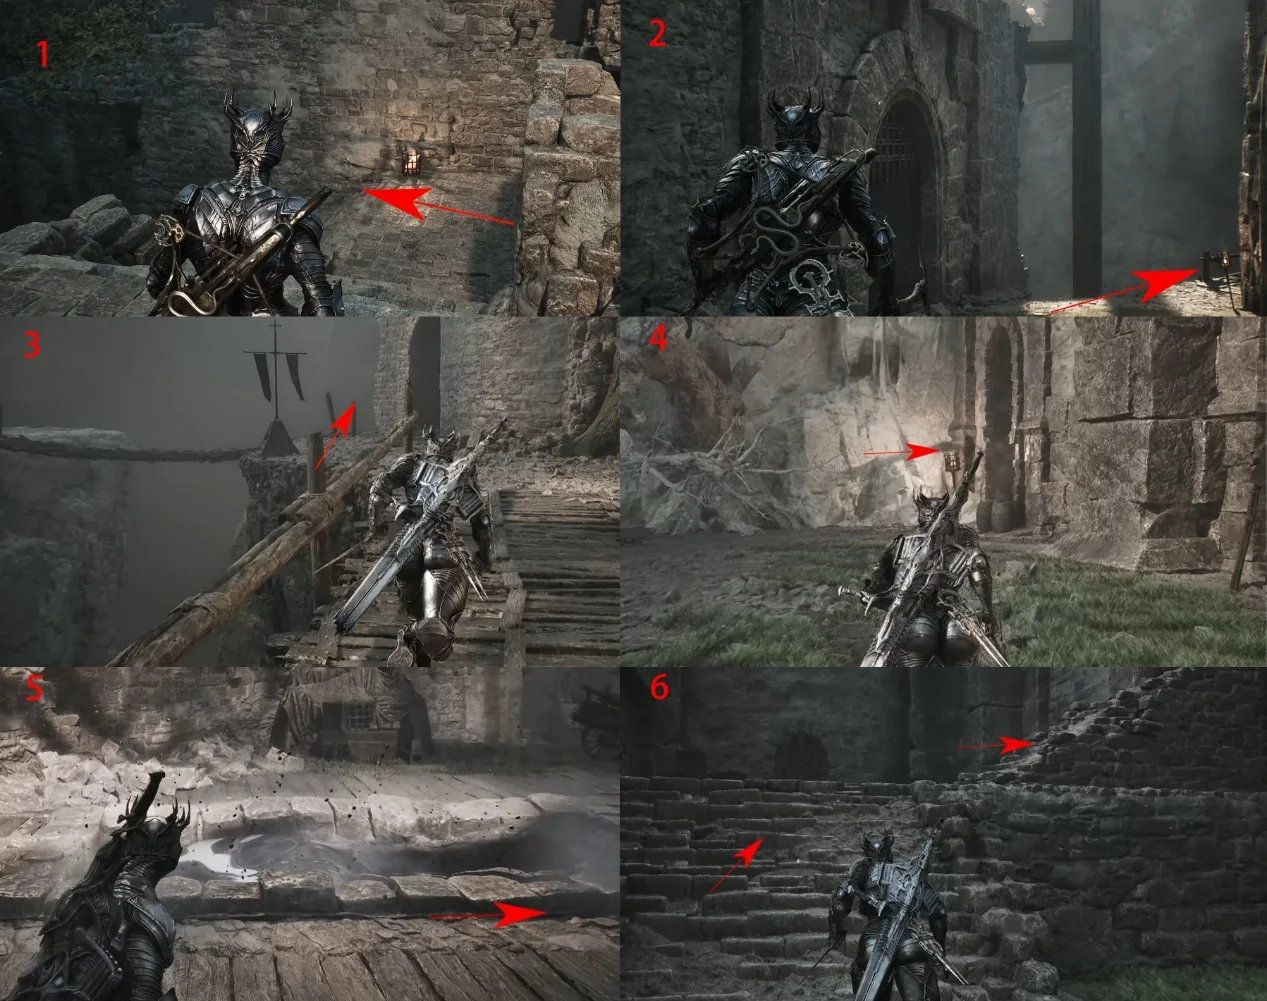
Annotated route down the stairs from Castigator's Keep
Route 01Go behind the Beacon and descend the marked staircase.
Annotated final route to Map of Mammon 2
Route 02Continue along the arrows to reach Map of Mammon [2].

Map of Mammon [1]

Start at Outskirts of Mammon Beacon.
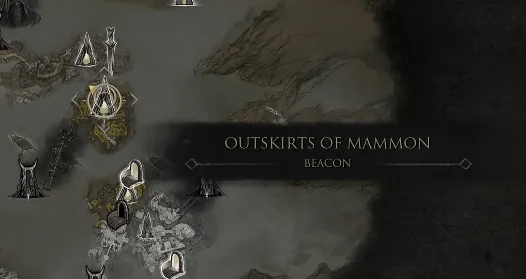
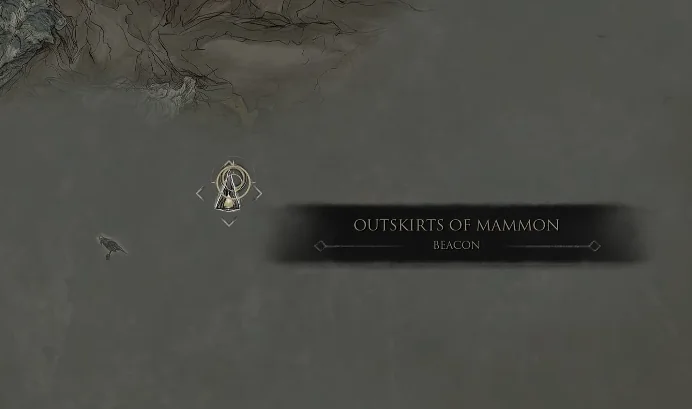
Outskirts of Mammon Beacon on the world map
Starting pointTravel to Outskirts of Mammon Beacon.
Annotated first route to Map of Mammon 1
Route 01Leave from behind the Beacon and follow the arrows to the portal into the next area.
Annotated final route to Map of Mammon 1
Route 02Keep following the red arrows to the final point and collect Map of Mammon [1].